Passion, It's the thing that drives us to achieve. The push we feel to dare to dream something, ideal, and then manifest that vision into reality. For anyone who's ever fallen head over heels into an engine bay, or body work, or getting your car track ready, YOU KNOW that feeling that drives you to customize and make things as you feel they should be. Your intuition is second to none. RC Car Skyline GTR R34 Custom Built Remote Control Car This GTR is no different from any of the other incredible cars featured on this site ( just look around; there's red ones , blue ones , silver ones , white ones , black ones ) - except for one, small, detail. - It's 1/7th the size! You wouldn't be able to fit inside it, but it still rips around like a GTR should, and is a whole lot of fun to drive I'm sure, and the customization on this build is phenomenal. Nissan Skyline GTR RC Car Rear End Spotted on the RC sub, user XJuggernaut101 shared their build story with us of ho
Nissan Skyline GTR Build
on
Get link
Facebook
Twitter
Pinterest
Email
Other Apps
Picking the right one... October 8, 2008
After the experience I'd had with my first Skyline, I was on the hunt for one that would more suit my level of experience. In the very back of a warehouse, covered in dust, I'd found A 1991 Nissan Skyline GTR in Pearl Metallic red, with roughly 110,000 km on the clock, the reason I chose this one in particular was because it was 100% stock. It had ZERO modifications, not a single thing! and that's such a rare thing to find in these cars, its one of the only ways you can be sure the car is in good condition. We had it up on the lift where we did the inspection, no leaks, nothing out of place, not even any dents or scratches on the frame rails where you usually see evidence of improper jack lifting.
Then we had at it with a compression test... Everything showed above 150 PSI. Stock motors fresh from the factory will see 160 PSI... so showing above 150 on all cylinders was really good, I had found the gem! the oh so rare, un-abused Skyline GTR - a real garage queen! and she came with floor mats! what a find! the paint work was good, except for a few very small scratches in the paint from shipping.
After checking out the auction sheet... both the car and I were sold!So I got the car registered, plated and inspected by the Insurance company, it was a lot of running around to do in one day. when I finally got home I gave her a good solid clean and began compiling a list in my mind of what would be next to do to the car... I wasn't sure at the time how far I would be taking this project, but like anyone who's obsessed over anything knows, it's never just a few small mods....never.
First upgrades...December 10, 2008 It wasn't very long at all before the parts started coming in. I'd made a trip about 30 minutes east of Montreal to a very small mechanics shop to pick up some parts, Cusco Front Tension rods, Cusco Rear Upper Control arms, Samco rad hoses and Nismo Front & Rear Strut braces. I figured some handling improvements would be the best place to start.
The trip itself wasn't much to talk about except for one thing... the car these parts were coming off from was a legend! I entered the shop and talked for a while with the owner, he explained to me how he wanted something different from his current setup and was selling off parts from the car to pay for a new engine build, so I asked to see his car. He took me to the garage next door and right before me stood an engineless torn apart HKS Dragster!... the motor sitting on the floor had the biggest turbo I'd ever seen, and the supporting exhaust was measured at 5 inches! all the way, turbo back! an un-real sight.
The motor was a 2.8 L HKS Step 2 stroker, the body had a full roll cage and a complete set of HKS gauges to compliment the Bride racing seats! Naturally sporting an HKS sequential transmission. The rims were monstrous 18 inch x 11 BBS rims wrapped in slick radials, the oem body panels for the wheel wells were swapped for giant alloy frames to house the massive tires.
I'll never forget the story the owner told about why he was breaking it apart...
"It's not drivable... every time I shift the car wretches, and starts burning rubber all the way to 9000 RPM.. and when the turbo comes on at full boost, there is no chance of maintaining traction! It's a total monster!"
*mouth open* wow.... So I picked up the parts, payed the man and went on my way... what a car.
More parts... January 17, 2009
So next on the list were some coil-overs, I wanted something that was pretty stiff to keep the car stable at high speed, but also still streetable. I definitely also wanted to be able to adjust the ride height so that I can change the car higher or lower with out using lowering springs. I found exactly what I was looking for! A set of Tein Type HR's.
At the same time it felt appropriate to pick up an exhaust system too, so I grabbed this 3" Cat-Delete pipe and this 5Zigen Fireball II exhaust system, - unfortunately when it came time to mount the 5Zigen to the car later on, we discovered it wasn't meant for skylines at all, probably more for a Silvia, so I went back and got something different instead! But heres a picture of the exhaust none the less.
More exhaust... January 22, 2009 At this point, buying parts was in full swing, and I followed up with buying this Trust MX equal length down-pipe in order to help with quicker turbo spool and get my boost coming on faster, it's a pretty nice 3.5", and just had a fresh coat of POR15.
Better flow... January 30, 2009
While out picking up the exhaust I caught a glimmer of something special, something rare, on a front nose clip of a black GTR.I gave the shop owner some cash as a deposit and said I'd be back the day after to pick it up...
It was an HKS Front Mount Intercooler hard piping kit, these kits are designed to create smoother air flow through the complex inner workings of the GTR, you see an increase in performance and power due to the decrease of frictional resistance as charged air makes its way through the intercooler and into the cylinder head. The picture here is a simplified version of this kit, it's basically the same as for skylines, except the GTR is twice this since it is twin turbo.
Vrrroooommm..... Pssshhhtt!... February 11, 2009 Through the grace and good luck of forum hunting, I was able to get these classic Blitz blow-off valves, they will give the car that classic pressure relief sound that so many turbo car enthusiasts envision when they imagine performance cars.
More.... February 24, 2009 I had placed an order with AMS for some new Front Upper Control Arms since my oem ones were starting to wear out, it also compliments my Cusco bits very nicely. This should make for a very awesome suspension set up since every component will be fully adjustable!
The big day... March 30, 2009 Over the winter I had been accumulating parts from all around the world, piece by piece trying to bring the car up to spec from the boring stock style. I'd dropped off the GTR a few days prior with nearly $5,000 worth of parts in the trunk...
I got the car back from the shop, with all the parts installed And a long list of maintenance issues that had been addressed for good measure. The Skyline was now not only in PERFECT running condition, but also sporting a few new mods to give her some extra power. Heres a quick list of what the guys at Autoworx did:
New timing belt, idler, tensioner, CAS seal, crank seal, + N1 water pump installed.
New rear inner and outer tie rods installed.
New Front inner ball joints installed.
New front inner tie rod boot kit.
New Spark plugs
Flushed and replaced the fluids with top notch synthetic oils (Tranny, motor, rear diff, transfer case and front diff).
New valve cover gasket set and grommets installed.
New Apex'i cold air suction kit installed.
Step1
The first thing that needed attention was the coil-overs, although they had no leaks and were in good condition, they hadn't been used in so long and were in desperate need of a refresh.So the guys got busy, stripped them down and rebuilt them.
Step 2
To start the rims came off and the car went up on the lift, at this point the fluids were all drained out. Then the old exhaust came off, from the muffler at the back to the downpipes up front, the whole system.
The old spark plugs came out and thank god too! from the looks of them they were quite due for a changing.Then they proceeded to take the old timing belt off, followed by the old water pump in preparation for replacement.
Then with the new N1 water pump installed the valve cover gaskets were addressed, this was all part of the 100,000 km maintenance routine, as it's common around that mileage that water pumps can fail and the valve cover gaskets and grommets leak. It's easy to tell as when you drive you'll notice a smell of oily exhaust if they need changing.
Step 3
Then they moved onto the suspension bits, theres a lot of handling to be gained by making the move from heavy, clunky oem components to fully adjustable light weight, stronger components, first the front upper tables (control arms) had to come off because the bushes were worn out and there was excessive play in the wheel system up and down.
Followed by the rear upper control arms and the rear inner and outer tie rods for the same reasons, the bushings were all worn. Essentially it was stripped down to the bare spindles on all 4 corners.
Step 4
Then it started to come back together, but better than before! In the rear was now the new Cusco rear camber arms and Tein shocks installed on all four corners. Up front is the new AMS front tables and tension rods.Then all the new ball joints were installed. Then new Tie-rods set up, The view from underneath tells the whole story.
Step 5
With the Trust Greddy MX down-pipe installed now with some new gaskets, they followed by installing the new exhaust I had exchanged for the 5Zigen which didnt fit. The replacement was the HKS Hi-Power Silent II system. The fresh Samco rad hoses were hooked up, the old radiator hoses were showing their age. After many heating cycles the rubber had become spongy and brittle and was past due for a change.
Then the Blitz VD Blow off valves were bolted in and hooked up to the vacuum source... and of course the final pieces, the HKS intercooler piping and the brand new A'Pexi Performance cold air induction kit. It's a pricey kit, and it gets even more expensive because twin turbo means twice the price, but after much reading it's always come across as the top rated kit in terms of both power gains and keep the engine air clean.
And the end result was spectacular, I couldn't have been happier with the work.Here's short video to really show what it sounds like from in the car, it's hard to deny that blitz makes the best sounding Blow off Valves.
Time for some shine...April 10, 2009
After giving it some thought I really felt the engine bay was looking down and dirty, and I really didn't like the painted black Nismo strut brace like that. So... off it came and I gave it a quick polish to restore it to its original glory! While I was at it I also gave the Apex'i intakes and the twin turbo pipe a few passes with some progressively finer sand paper. Polishing was fun cause the result was evident right away.
New shoes feel so good... April 17, 2009
The oem rims were of excellent quality, light weight and well made but they were very small and couldn't handle a big meaty tire. So I sold the stock rims and bought some Volk racing TE37's bronze rims, The Volk rims are the world renowned first choice in race applications, made in a very specific forged alloy process by Rays Engineering Japan.
The fronts were 18" x 9" + 40, wrapped in falken Azenis 235/40 ZR18, and the rears were 18" x 9.5" + 40 with Dunlop Direzza DZ101's 265/35 ZR18. Although the offset wasn't exactly where I wanted it so I picked up some Nismo 60mm Strengthened wheel studs, and a set of H&R +20mm spacers which would help bring the front rims out to the same edge as the rear rims and allow for better turning and handling.
The GTR is All Wheel Drive, and is a rear wheel drive biased setup. This means that for the most part the car is always in rear wheel drive, but it also has ABS sensors on each wheel and a G-sensor in the middle of the car that detects lateral and longitudinal loads. With those 2 sets of sensors the cars ECU can determine if the wheels are slipping, or if you are turning heavily and will apply power through the transfer case and into the front differential and wheels to give the driver more control to handle all the power. So normally having different size rims would be a bad thing, because the ECU would sense the wheels slipping due to the different size and profile of the tires on the front and rear. But if you crunch the numbers and you make sure you get the right sized tires, it can be done to an advantage, to sort of trick the ECU to become less pro-active which then allows a slight delay before the AWD kicks in, this makes it possible to do more aggressive power sliding in corners and really get all 4 wheels screeching around a turn. It really gave the car are much better driving feel, more grip and just looked a whole lot meaner.
Heres a video of the Rays Engineering manufacturing process:
Alignment is due... April 28, 2009
Then it was time to get all those adjustable links that were installed previously and the new wheel setup straightened out to keep it all tight and mildly aggressive on the road. So I went up to Garbis Alignment in Laval where I spent the better part of the morning watching as the man adjusted everything, and fine tuned my suspension set up.
I found they did a very good job and for a semi-reasonable price too. Rear camber was set to -1.2 and -1.0 in the front. toe in/out was pushed in quite a bit too.
More Stability and Handling... September 17, 2009
Handling is really important to me, It's far too easy to just press on the gas in a car like this and climb to speeds in excess of 200 km/h. I wanted to give the car a little bit more of an edge, so back I went to Autoworx for another major overhaul in the wheel well departments.
First the Old rubber brake lines were removed and the old fluid drained out, its probably been in there since the car was made so its a good thing it was out!Then these new stainless steel braided brake lines with plastic sleeves to guard against the brake dust were installed, the stainless lines will provide for much better pedal feel, and some new Motul RBF660 high temp racing brake fluid replaced the old stuff. The guys even attended to the Brackets around the hubs, they were sandblasted and repainted, as they were looking a little dirty!
Then it was time to address the ill thought HICAS system, which is the cause of so many dangerous situations. The HICAS was Nissan's attempt at a 4 wheel steering system, unfortunately for most people it was the target of removal very early on. The system was heavy, almost 60 pounds worth of piping and hydraulic lines which ran all the way from the engine bay to the rear sub-frame. It's supposed to help with high speed turning by adjusting the rear wheels to plus or minus 1 degree on either side, but mostly it only resulted in correction-counter-correction problems as it was hard to predict when the car would adjust in a drift or power slide.
To start with the power steering pump was opened up and the fins that drive the HICAS actuators were removed, this would prevent the pump from wearing out due to pushing liquid and never actually moving anywhere! Then the HICAS steering rack at the back of the car was opened up and the actuators were welded so they would never move.I'd asked Haig (the shop manager) to do something special with my brake calipers.
So they stripped the caliper down, ground off the ugly casting marks from the manufacturing process, and rebuilt the calipers to new. I had them under a time crunch and the guys pulled through late in the night and early in the morning to get this finished on time but it came out spectacular!
Then it was time to start putting things back on, so 4 Brembo made, Brand new Nismo Cross-Drilled Rotors for the front and back, which were then coated with Zinc anti-corrosion paint. Followed by a set of Hawk HPS Street brake pads for all 4 corners as well.
The Pads were then all coated with Wurth's Anti-squeal. We also had installed a set of Red Alloy rear differential and rear sub-frame spacers to get rid of the old rubber ones (which were highly worn out) and give the back end a VERY solid footing. Defi Gauges and Control Unit II... October 15, 2009
After coming upon a deal from a forum member looking to part with a nice kit of gauges, I received 4 Defi BF Link 60 mm Amber Gauges, I was really pleased, they came with all the wiring, all the sensors and even all the boxes and user manuals, essentially brand new:
Oil pressure
Oil temperature
Boost pressure
Water temperature
Defi Link System Control unit II
As they say... "Knowledge is power". The more we can know about whats going on inside the engine, the better chance we have of keeping things long lasting and healthy! The Defi setup is perfect because the adjustable red back lighting makes it easy on the eyes, but it also has s peak alarm feature that will beep and flash if the oil pressure falls too low, boost is too high, or temperatures get too hot. It can also data log a couple of minutes of information which you can then play back in real time to see how everything does, after say a lap around the track.
New Lighting Scheme... October 17, 2009 I'd ordered a set of replacement LED bulbs from a guy on the Australia forum, surprisingly they arrived in less than 2 weeks and were really a great product for the price. I went with all red LED's, they're going to replace the bulbs behind the speedometer and the bulbs in the A/C climate control unit, more on this later though.
Another trip to the shops... October 20, 2009
We're fortunate in Montreal to have access to about 14 different JDM chop shops, these guys import cars and engines and parts, usually if you need a part for a skyline in a pinch, you can hit up any one of the shops and spend a few hours digging through piles of parts trying to find what you're looking for.
It's not the kind of place you'd go to if you don't know what you're looking for though, the staff is always less then helpful and sometimes rude and quick to anger. But sometimes you can get lucky too in these shops, often the staff are just too busy, or don't care, so you pick up a part, flash some cash and make an offer. I've been able to get a few deals in the past, but also had some run-ins and near fights.
If you recall the story about the HKS drag racing car from the beginning, well that guy found the drag car in one of those chop shops, and the guy sold it to him with out even opening the hood, so he paid a ridiculously low price, near $12,000 and got a car worth over $100,000 worth of parts... sometimes you get lucky.Well for me on this day I was a little bit lucky I suppose, I spotted 2 items that I went home with, first was the Nismo classic metal oil filler cap. This cap is really a historic part as it hasn't been manufactured in easily a decade and I got it for a steal of a price too!
As I was walking out, I noticed a GTR nose clip - just the front half of a car - with an after-market inter-cooler. Went in for a closer inspection and found out it was an ARC inter-cooler. ARC is often revered as the top of the line in cooling technologies for these cars, but it was a little damaged, and showed signs of oil and coolant being on the interior. So we brought it down to the shop floor and pressure tested it, it held pressure, so I made an offer and took it home.
Thats when the real fun began, I ended up polishing the individual bars and plates, and the end tanks to like-new condition. Then I had to address to cleanliness of the inside of it, it seems the car it came off from was suffering from a blown head-gasket or something, there was oil and coolant all over the inside.
I prepared a bath of super hot water and Varsol Mineral spirits, I washed it through-out 5 or 6 times before oil reside stopped pouring out. Then I prepared a second bath with Simple Green and hot water, this would remove any left over residue and the harsh Varsol from before. Finally it was clean and ready to use.
JDM Shops, Round 2... November 20, 2009
We had such success the month prior a group of us decided to go for a second round back to the shops, at this point they had been receiving shipping containers full of parts on a weekly basis, so there was a good opportunity to snatch up some rare parts! This time I picked up a Trust Greddy Full Auto timer, which has a TON of features like:
Auto turbo timer
0-100 km/h attack timer
0-200 km/h attack timer
volt meter
speedometer
lap timer
I also picked up an engine earthing kit, I'm not sure these things actually do as much as they're advertised to do, but I'm sure it doesn't hurt anything, and it was a great deal, so why not.
At this point I wanted to spend some time actually installing all these accumulating parts, so the first task was to wire up the Greddy Ignition Harness for the Auto timer, it was pretty easy. To start I pulled off the under-dash trim pieces and found the ignition wires on the lock cylinder, traced them back and spliced into all the necessary wires, of course soldering and shrink tubing every connection.
From there its only a matter of connecting the plugs together, then finding the proper pin on the ECU to tap into the vehicles speed sensor, and the handbrake position switch. With these 2 inputs the Greddy Auto timer calculates how long the car should cool down for based on how far, fast and long you drove.
Then I did all the wiring for the Defi control unit and sensors and gauges through the dash. This meant tracing the sensor wires from up inside the dash, and feeding them into the center console area. With everything labeled it was pretty easy to hook it all up, just followed the Defi instructions.
I then swapped the old bulbs in the AC unit for Red LED's to keep with the theme being set by the Defi Amber gauges. Now time for some modifications to the center console itself, I fabricated a sheet metal bracket to hold the AC unit and climate control system in its new location, it sits there quite firmly. I had to remove the cigarette lighter and the ashtray, but those are of no consequence. I'll most likely install a 12V hook up somewhere else later on if it turns out I need one. You can see the AC unit all lit up in red. Things were finally starting to come together.
Later that day the doorbell rang, and I got my new cluster in the mail all the way from the UK! Again another forum find, it's a super rare Veilside 340 km/h speedometer cluster. So I pulled off the oem cluster, and put the new one in place.
Before swapping it in I replaced the old white globe bulbs with the new red LED ones. The whole cluster lights up a very nice red I think, but then it was time to get started on the A-pillar gauges, as I had also received my Trust Greddy 60mm dual Pillar Gauge pod holder from Takeda Enterprises. In my mind I was setting up a fully functional information ready cock-pit.
Well at first the defi's didn't exactly fit right into the holders, it was too much of a tight squeeze, so I used my New Dremmel and made the holes a little bigger. It was a much better fit after enlarging the holes. Then it was just the simple task of plugging it all in to work together and putting the pillar back in the car! I was really pleased with the cleanliness and end result functionality of it all.
Another Forum Find... November 28, 2009
Finally managed to get around to meeting up with another forum member, he had for sale, brand new, what is arguably the best oil cooler and oil filter relocation kit, plus it has the added bonus of giving you more oil capacity for the oiling system which is an oh so tender spot in the almighty RB26 motor, and often the area most people focus on improving for reliability. I had been waiting for one of these to pop up somewhere local for a long time.
The Trust Greddy Oil cooler and filter relocation kit works by installing a sandwich adapter plate into the stock oil filter location, then the earls braided lines connect to the new oil filter block, which has a built in thermostat to allow proper heat cycling of the oil. You don't want to be cooling your oil before its even hot so the thermostat only opens when the oil is hot enough. Once the thermostat opens the oil flows into the big blue radiator heat exchanger which gets mounted in a place that air will flow through it.
Back to Autoworx... November 30, 2009
Every year around this time in November, most of the community take their Skylines off the road for the winter. In Quebec they use salt on the roads, and the roads in general are horrible so it's not a good idea to drive the Skyline in the snow. Although if setup properly it can be done. So the car went back to the shop to get a compression test done.
At the end of the season each year I like to get the engine tested so that I'll be able to catch any problems early, and if necessary handle it over the winter so it doesn't interfere with the summer enjoyment of the car. It's by no means a necessary procedure, but I do it just to make sure the engine is still feeling healthy! and we got great results...
Cylinder 1 @ 155.5 (PSI)
Cylinder 2 @ 154.5
Cylinder 3 @ 167.5
Cylinder 4 @ 163.0
Cylinder 5 @ 167.5
Cylinder 6 @ 160.0
At the same time I had the guys install all 4 of my Defi sensors and pass the wiring through the fire wall for me so that I could wire it all up inside myself at home. Unfortunately when they took the upper rad hose off to install the Greddy Water temp sensor and adapter into the old plastic radiator, the top pipe crumbled to pieces! This was a common occurrence among these 20 year old Skylines, it happens as a result of heat cycling over and over. So since I had been meaning to move to a new alloy rad this was as good as time as any, so I ordered up a new Koyo Performance radiator and the guys installed it with a new radiator cap as well. By this time my engine bay was starting to look pretty serious, a lot of alloy parts now.
New wheels again... December 30, 2009
After much deliberation I finally bit the bullet and decided on a set of rims I would be really pleased to keep for a long time, it's not that the TE37's weren't awesome, mine were just in a sore state being all scratched, and dinged up.
My requirements before even going shopping were simple, the new rims HAD to be 18" by at least 9" wide, I wanted a bronze color, and something simple that would show the brakes well, it also had to be genuinely made in Japan, and forged (I really like the light weight wheel designs) I also definitely wanted to buy new, so I was sure the rims were in good condition.
So when I found these I jumped on them! They met ALL my requirements and then some! They're literally brand new! Never been mounted on a car before! the paint was immaculate, and the sizing was awesome, just what I was looking for!
FRONT: 18" x 9" wrapped in Bridgestone Potenza RE-01R 235/40 R18
REAR: 18" x .9.5" wrapped in Bridgestone Potenza RE-01R 265/35 R18
As before, usually people don't like different sizing front to back on GTR's because of the AWD system, but Having experienced first hand the difference a wider rear makes, I really wanted to stick with it, again crunched the #'s the rolling diameter difference is less than 1.5%... so it won't affect the AWD system negatively, the bigger rear actually helps to keep the torque more rear biased, which I prefer.
I love the look, the fitment was bang on, and it all worked out well with because I have the longer Nismo studs up front and 20mm spacers, so it all sits perfectly, and holy god those rear tires are monsters! ... It was a good year end indeed.
I need some Space... January 20, 2010 At this time I received another package in the mail, there was a guy on the forums who was selling a set of 20mm spacers that would be perfect for fixing my offset width problem. They arrived in good condition and awaited installing on the work bench along with a hundred other parts and bits all waiting to be installed.
Bad News...? Very Bad News... Just before putting the car in storage I had gotten the Defi gauges hooked up and could finally get an accurate reading of my oil pressure. You see, these cars had a common problem, the Achilles Heal of the Skyline RB26 motor is the oil pumps. This wasn't a problem on all Skylines, only the GTR's made between 1989 and 1991. After 1991 Nissan fixed the issue. Most people will tell you the problem is the width of the drive on the oil pump gears, they say the engagement area is too small, while that may be true, it's also not the 100% exact correct answer. If you're more technical minded have a look at my detailed explanation here: Real problem with the RB26 Oil Pump
So, to continue the story, I was driving and decided to test out my Defi data logging box before I put the car away for winter storage, I drove pedal to the floor through first gear, then second, and halfway through third, then I drove calmly for a little bit, then aggressively again. Parked the car, and hit "re-play"... I noticed it right away... regardless of what RPM I was at, 3,000... 5000... 8000! It never showed pressure higher than 2.5 Bar (36 PSI).
Now at this point in my life I had no idea about the oil pump problem, I was aware some of them had problems but not to the extent I am today. I was reading through some of the build diaries on the forum when I noticed another member reported the same symptoms! And he was local! So I shot him a message and asked him what he did about it? He ended up pulling his engine out, and confirming that indeed the screws on the back of the pump were loose.
I had my suspicions of my own car at this point and I was starting to freak out, So I started talking... I talked with mechanics, I spoke to friends and relatives. Anyone who could provide any insight on the best way to handle this problem I wanted to hear from. After considering all options I'd Devised a plan:
The Plan... I would pull the engine over the winter, remove the oil pump, replace the pump with a new one, and see if I could keep the price of this whole thing down as much as possible. It had always been a dream of mine to pull an engine out of a car, especially a legendary car, but I had no tools, and no knowledge... But I was keen, and ready to learn. So I considered this the best opportunity to get in there and get my hands dirty.
Getting things moving... January 30, 2010
The First step in the process was to gather all the parts I would need for this project. A member on the forums was selling a Nissan engine gasket kit, and he was local in Montreal as well, so I rang him up, and we met that night. The engine gasket kit included basically every seal, gasket, grommet and crush washer that is needed to refresh the RB26 motor.
From Across the Pond... February 3, 2010
Many times we can find really good deals on forums based in other countries, this time I'd found a deal from the U.K. I got a set of silicone water heater system hoses to replace all the old 20 year old rubber hoses. The OEM hoses were very crunchy and lost all their flexibility, making them prone to imminent failure. Given the difficulty of replacing these hoses if one leaks while the engine is still in the car, I'd decided for the price of something like this it would be ridiculous not to change them. So these new hoses would serve perfectly. At the same time I'd also ordered a few cosmetic upgrades for the engine bay from the UK as well, a stainless steel laser etched GTR fuse box cover and ABS cover.
Conservative Rebuild... February 18, 2010
Initially the plan was to keep it simple and mostly standard, to only fix the oil pump, but as time went on it just became too easy to justify more new upgrades, everything was: "well if the engine is coming out I might as well change this at the same time, make life easier for me in the future". I'd put in an order with a shop from B.C. Canada for a new N1 oil pump, Vibrant Performance silicone hose couplers, Stainless Steel T-bolt clamps, a pair of new Garrett 2860RS-5 turbo-chargers, Stainless steel braided oil lines and the necessary oil restrictors for use with the new turbos.
These new Garrett turbos were rated for 350 hp each for a combined rating of 700 horses. They featured Steel internals (which is a huge upgrade over the OEM ceramic), oil and water cooling and ball bearing design in replace of thrust or journal bearings. Due to the different bearing mechanism vs. OEM switching to these turbos meant also installing oil restrictors in-line with each turbos oil feed, so getting a set of braided lines would just make everything easier.
The N1 oil pump is often a subject of much debate when people talk about engine rebuilds. The debate arises for 2 principle reasons. The first being that a batch of bad N1 replica pumps were circulated through Ebay, so after people installed them in their cars, the oil pumps would fail and fall apart, resulting in massive engine damage. The second reason is because people were changing the oil pumps but not addressing the real issue, which is with the crank drive, and not the pump itself. Theres almost no difference between a new OEM oil pump and a new N1 pump, they both flow the same amount of volume but the N1 pump is rated for a higher pressure. So having made the choice to go with the N1 oil pump, I knew I'd have to do something about the crank later on.
Less Turbulence... March 18, 2010
Often with the move to bigger turbos that flow more air, original equipment designs can become too restrictive for the bigger power potential of the upgraded components, and they become the limiting factor. On the intake side of the engine, the "twin turbo" pipe converges the two independent air flows coming from the turbo compressors, into one large stream before entering the intercooler.
The original design of this junction causes a lot of turbulence and creates flow restrictions and can sometimes even lead to turbo shuffle and hesitation under acceleration, basically one turbo is fighting the other turbo instead of reaching an equilibrium they bounce back and forth.This can be seen in the first video on the left, there should be two separate color streams of orange and white, yet they are mixed and turbulent.The simple solution to this problem is to modify the pipe with a divider plate down the middle to encourage the air to flow more smoothly.
This hypothesis was put to the test by the engineering firm "Elitetech Automotive", and they made their findings public with these short videos. In the second video it's very clear that the orange and white smoke is nicely separated and there is far less turbulence in the stream, which means better flow, and more power. Having access to a machine shop through family I had this modification done to my twin turbo pipe and was quite pleased with the result.
Relocation... March 22, 2010
I always like when things can look clean, simple and purposeful. With those ideals in mind I set about to clean up the look of the engine bay by removing and relocating as much as possible. To start with I wanted to move the battery into the trunk and later set up a sort of electrical panel in the trunk. Moving the battery would also help with weight distribution. So I placed an order with Summit Racing for a battery relocation kit, which I'd install later on once the engine was out.
Final Pieces of the Puzzle... March 30, 2010
As I mentioned before, changing the oil pump and not addressing the issue with the crank would be completely pointless. There were two choices when it came to addressing the crank problem; first we could take the old crank, get it machined with a new crank collar on the nose, then get it balanced and have the journals micro polished. After all the machining time it would cost me, and knowing theres still a chance it could be done incorrectly and we would only find out once the engine was fired up again I decided to opt for the less riskier choice and just buy a brand new R34 Nissan crank shaft.
As my luck would have it, there was another forum member who was going to rebuild his engine but had given up and decided to sell off the parts he'd already acquired. So I met up with him, inspected the crank and handed him the cash. The crank had some very good ratings stamped into it, it was still brand new sealed in the Nissan packaging. Done Deal!
While we were discussing our deal for the crank, he took the time to elaborate on his project, and why he decided not to continue. It seems many people start to build these cars and get discouraged because of all the trouble and cost associated with doing a project like this yourself. While there is a wealth of information available on-line, theres no real sure shot guide to doing something like this, so often we find ourselves down and out with no where to turn for help. But with any project this big perseverance is the key to success, it's all about overcoming one problem at a time, and before you know it, you'll be finished the whole thing.
Anyways he'd mentioned having some other parts for sale too and wanted to see if I was interested, at first not really. But then he mentioned he had a complete RS*R stainless steel turbo dump pipe and down pipe kit. This kit is somewhat rare as RS*R hasn't manufactured this kit in almost a decade. The dump pipes feature a divided waste-gate extension, which helps with exhaust flow and allows the turbos to spool up quicker and be a lot more responsive. After having a look at it, we came to an accord, made the exchange and parted ways. Another incredible find thanks to the forum friends.
Culmination Day... April 23, 2010
So for the past 4 months I had been working away piece by piece to get the engine out of the car, April 23rd 2010 was the culmination of all that work. I picked up my engine from Autoworx, where I'd sent it to get the bearings sized, and the crank and oil pump installed. This was something that had to be done by a qualified person, choosing the correct bearings to match the hardness and rating of the crank shaft is crucial to the longevity of an engine. While picking up the engine I also grabbed a few other new parts that would be needed during the re-install.
I needed a new shifter boot kit, since when removing mine I accidentally ripped it in half. It's also good to replace every so often anyways as it does wear out. I also got a new set of Nissan engine mounts, my original ones were actually split right in half the whole time, but no one ever knew because you can only see a problem like that once the engine has been removed. Lastly I got all new belts for the alternator, power steering pump and air conditioner pump, and a full set of oils and fluids that would be necessary to get the car running since you have to drain almost every fluid to pull the engine out.
Getting the Engine Out... January through April 2010
I suppose this is sort of a Tarantino approach, but nonetheless we finally come to the engine procedures. Starting in the first week of January I began the tear down of the entire car, the plan was to strip away everything that I planned to do work on.
In this section I'll only give a brief over-view of what it was like to pull the motor, and some tips that really helped me to get it done. For a complete step by step walk through of how to pull the engine out of a GTR I'll refer readers to my tech article in the "How-To" section: Complete Walkthrough - Pulling the RB26 Motor
The best way to start a project like this is to get a notebook, a roll of masking tape and a sharpie marker. For every single bolt or wire that I would remove, I would label the part that came off the car, label the place where the part goes, and write down the tag code in the notebook to keep track of the order in which things came off so they could be put back on in the reverse order. This system proved to be very useful, not once did I find myself doing something, then un-doing it because I had forgotten a small step. Everything went well.
To begin the process, I first removed the body panels, followed by all the intake piping and intercooler work. Then came the exhaust components, radiator, throttle cable, Axles, and all the wiring. Since I'd decided to pull the engine out with the transmission still attached in one piece, I needed to also disconnect the rear prop shaft, and the AWD transfer-case pump.
Once everything is disconnected from the motor, it was ready to come out. Working in my small underground garage I was limited by the height restriction, the engine crane actually scraped against the ceiling and for a moment we weren't sure we had the clearance necessary to make this happen. But it all worked out in the end.
We got the engine out, separated the motor from the gearbox and shipped it off to Autoworx, where it spent the month of April in their engine shop.
Modifications... January through April 2010
This next section will feature short descriptions of modifications that are covered in the "How To" sections. I performed all these mods while awaiting the return of my engine from Autoworx.
Battery Relocation... May 1, 2010
I finally got around to picking up a new battery. I went with the Optima Red Top gel battery, although its fairly heavy, it provides more than enough power and the gel means that it could be safely relocated to the trunk. Basically the relocation involved running a heavy gauge set of wires from the terminals in the front of the car to the battery in the back.
I also installed a 200 A circuit breaker, and a Stinger Electronics voltage display. I mounted everything on a panel that I fabricated from sheet aluminum which was then mounted to the chassis. For a complete step by step guide on how to do a battery relocation, refer to the tech article: How To: Battery Relocation
HICAS Delete
As I'd mentioned before, Nissan included a 4 wheel steering system with the car which was less than perfect to say the least. Now, the guys at Autoworx had already locked out the rack in the rear sub-frame, and disabled the pump. But all the heavy hydraulic lines and solenoids were still attached. Having the engine out of the car was the perfect time to finish removing all those, now unnecessary lines. For a complete step by step guide on removing the HICAS, refer to the tech article: How To: Removing the HICAS
Rear Wiper Delete
Nissan released an N1 version of the GTR which featured weight reduction schemes such as no ABS, no Air Conditioning and among other things; no rear windshield wiper. The removal of the rear wiper comes from the cars racing roots, a rear wiper is almost completely unnecessary on these cars because as soon as you get moving at any speed above 60 km/h, the wind clears all the rain off the back window.
For the most part the rear window stays completely dry in the rain due to the negative pressure vacuum that is created by the aerodynamic shape of the car. So in the spirit of racing and weight reduction I removed the whole rear wiper assembly and plugged the glass. For a complete step by step by guide on removing the rear wiper, refer to the tech article: How To: Rear Wiper Delete
Chassis Protection
Because I live in Quebec - where they use tons of salt on the roads to combat winter - I wanted to beef up the rust prevention on the underside of the car, in some of the places that see the most wear and tear. even though the Skyline is undercoated and made from galvanized metal, it was still important to me to do as much prevention as possible. I see rust as sort of the cancer of metals, once it grabs hold its very tough to get rid of it, so the best defense against rust, is preventing it from ever starting in the first place.
I discovered a great product, POR-15 paint. It uses a chemical bonding process to adhere to the metal and forms a bond so strong that once dry, nothing can remove this paint. So I gave the frame rails and the inner fenders all a coat of POR-15, once dry I added some more rocker guard. This tech article shows the intricate process for rust prevention: How To: Chassis Protection
Engine Bay Clean Up
As I'd mentioned before in the section about battery relocation, keeping a very clean engine compartment is high on my list of priorities. I don't like to open the hood and see engine grease and grime covering everything, or old crusty wires slinking everywhere in and out. To me, keeping the bay clean has a number of advantages, the first being it demonstrates a certain level of pride in your work. Second with less clutter it makes working on things far easier in situ. Lastly there's something about reducing the entropy of the engine compartment that just feels good.
The engine bay underwent a very involved process of relocating some things to other parts of the car, cleaning and degreasing, and a mild wire tuck. Although it seems like a lot of work for very little actual gain, in my opinion it's all worth it. This tech article elaborates on the intricate procedures I used to achieve a tidy engine bay: How To: Engine Bay Clean Up
Charcoal Canister Delete
As part of tidying the engine bay, one of the parts that I wanted to scrap was the charcoal canister. There's more to it though then just chucking it in the bin, theres a number of vacuum lines the system used and not to mention a gas tank line that needs some care taken as to where it vents to. I covered the procedure in this tech article: How To: Charcoal Canister Delete
Washer Bottle Relocation and Intercooler Spray
To continue the engine bay cleaning process, one of the other things I did was to move the windshield washer reservoir from the front, to the trunk. This process is a little more involved then it sounds; not only does it require some re-wiring and running of new electrical lines, but I also had to make sure the plumbing would still work for the front window spray.
At the same time, I also decided that since I had removed the rear wiper assembly, I could use the spray nozzle up front. Installing it into the front bumper would allow it to serve as an intercooler sprayer. The sprayer, when triggered by the "rear window spray" button on the dash, will soak the intercooler down with cool water, while moving at speed, the water will evaporate off the intercooler and create a cooling effect, which helps to make a little bit more power. This tech article goes much more in depth with the explanation and procedure: How To: Washer Fluid Reservoir Relocation and Intercooler Spray
Steering and Suspension Overhaul
With everything unbolted from the car already, I was looking at all the steering and suspension components and decided they could all use a clean up, and a fresh coat of paint. I stripped everything apart, inspected all the pieces for wear or damage and greased up all moving parts. These are arguably some of the most important parts of the car, since they keep the wheels straight, accurate and on the road, so you're obviously going to want them to be in perfect condition. This tech article elaborates on all the details of inspecting and cleaning the suspension and steering parts: How To: Steering and Suspension Overhaul
Blitz Blow-Off Valves Overhaul
By the end of the season, I had noticed that the sounds my blow off valves were making wasn't the normal sound I'd gotten used to. Instead I was hearing a lot more compressor surge, people often refer to that sound as "turbo flutter". It happens when you let off the gas, from an on-boost position, when the valves open normally you hear a "wooosh" sound, when they don't open you hear the sound of the pressurized air flowing backwards over the turbos compressor blades, hence the "flutter" name.
After inspecting the valves, I had to completely dismantle them, and rebuild them, including polishing the brass pistons and making sure they both actuate, and re-seal properly. The complete walk through on rebuilding blow-off valves is in this tech article: How To: Blow-Off Valves Overhaul
Exhaust System Overhaul
In favor of sticking with the super clean theme I had going on with all the parts on this car, It was time to address the exhaust system; HKS Hi-Power Silent. It's a fantastic cat-back exhaust system, under normal driving its reasonably quiet, but as you open the throttle a little more it starts to growl. When you up as high as 8000 RPM it's really more of a scream, the sound is really quiet amazing.How-ever, it was caked in grime and dirt, obviously all the heat cycling an exhaust does is going to have this effect so I wasn't too shocked at the state of things when I got it all unbolted.
I started off with a few passes on the wire brush wheel to remove as much of it as quickly as possible, then sand paper, wet sanding and a sealant coat of high temp clear paint. I was able to get it to a really nice shine considering what I started with. It takes some time to refresh a system like this, the step by step walk through is outlined in detail in this tech article: How To: Exhaust System Overhaul
As long as I was in the mood to polish metal, I figured I'd also just do these little radiator support brackets at the same time. Normally they are black but I didn't like the way the black looked against the red radiator support beam and the alloy radiator itself. Hopefully a more flush look will make it all blend together a little better.
Getting it Back Together Now... May 10, 2010
After spending the winter tackling a long list of small, medium and large modifications to everything on the car, The engine had been at Autoworx getting refreshed internally, I sent it to them right after we got it out of the car, so they worked on it before I did any work on the external bits of the engine. There was quite a lot of work to do at this point, I still needed to install all the hoses, lines and the completely new turbo set up.
I ended up breaking a few of the water cooling lines on the turbo system, so I made a trip to Tuboquip here in Montreal where they custom made all new stainless steel braided water lines for me. The process of swapping the turbos and replacing all the external parts of the engine is detailed in this tech article: How To: Turbo Swap and External Overhaul
Re-Assembly Time... May 2010
Everything was now ready to go back into the car, the engine bay was clean, everything had been rebuilt and overhauled and the new turbos were all buttoned up and ready go! I was so excited by the prospect ofhearing that engine fire up that I worked all night and early into the next morning by myself to get the engine in. By the time I went to bed I had just bolted the transmission cross member into place and locked in the engine mounts.Re-assembly was far quicker than initial tear down, I was flying through everything, making sure to check my notes for where everything went. For the complete step by step walk through process of re-installing the RB26 motor check out the tech article: How To: Re-installing RB26 Motor
After a few days, I was finished with all the nuts and bolts, everything was connected, fluids were filled and we were ready to fire it up for the first time since being rebuilt.
I made sure to unplug the Cam Angle Sensor to prevent the ignition and fuel from firing just yet, as I gave it a couple of cranks to prime the oil pump system, seeing as it was a new pump and all. Anyone who's ever worked on a car and invested anything into it, understands the immense pressure as you wait for that one single sound...
You turn the key to the on position, the sound of beeping and flashing warning lights fills the passenger cabin as you hear the fuel pump prime the lines for ignition. Turn the key forward one more notch into the start position and you can feel the starter motor spring to life. The engine cranks one time around.... a second time... and on the third time it catches and begins to run on its on! The first seconds are crucial, eyes glued to the oil pressure gauge waiting for that needle to spring to life. After what feels like an eternity, it jumps to 8 Bars of pressure!
8 bars is a fair bit of pressure. So we let it run for a few minutes and notice some smoke. After a quick call to a friend, my concerns about the smoke were abolished. It's completely normal for new turbos to smoke for the first half hour of use as any shop dust and oil residue burns off, and the gaskets get more seated.
Double Check my Work... May 31, 2010
After an engine rebuild, you need to run the motor through whats known as a break-in period. Some people swear by all kinds of break in methods, but since Autoworx built my motor, and they guarantee their work I decided to listen to their recommendations. I needed to cover about 2500 km's before my first oil change, so I drove everywhere and as soon as I was ready I took the car back into Autoworx to check over all my work, and see how it was holding up. The guys at Autoworx changed my spark plugs, the engine oil and oil filter, the front differential fluid, flushed the coolant and replaced it with water wetter, anti-freeze and H2O. A road test revealed everything was in excellent running condition. So I went on my way with a smile from ear to ear.
Custom Center Console... May, 2010
I had this vision in my mind of what I wanted the interior to look like, and how everything would fit nicely and above all else be functionally intelligent. I'd already installed the Greddy A-Pillar pod with the Defi boost and oil pressure gauges mounted in it. The Veilside 340 km/h cluster was also looking good, red LED's were holding up well. The only thing left was the center console, and it was a real eye sore. I had no radio, no gauges, or anything at all installed there, it was just a big hole awaiting some beautiful panel assembly.
I got to work designing and fitting the Defi controller and data logger system and mounting the last 2 gauges, oil and water temperatures. When all was said and done I was really happy, It looked super clean and purposeful. Best of all it didnt draw a lot of attention away from the most important part, the road! Red was color of choice as the lightning theme because red light is the least bothersome color to drivers. The complete process for the center console design and build is outline in detail in this tech article: How To: Custom Center Console
Time for Cooler Oil... June 10, 2010
The last time the car was at Autoworx for its first oil change, this time it went in to button up a few loose ends. I had the guys finish the Greddy oil cooler install since up until now I was just running a loop back through the oil filter relocation block, I wasn't using the cooler just yet. They fabricated some brackets to hold it in place and mounted it horizontally underneath the car. My first GTR had the cooler mounted in this same location and I found it to work quite well, also it never scrapes because its mounted to the sub-frame. When I got it home, I could finally re-install the plastic front under-tray, I cut out a section to channel airflow up and through the cooler. Finally this car was really starting to look complete again.
New Clutch... July 30, 2010
I met with some forum members to pick up some parts that I needed. I found one guy who was selling a Toda light weight flywheel and basically new ACT unsprung 6 puck clutch kit, and another member had the exact AC high pressure line that I needed to replace my cracked one with. With everything I needed I headed back to Autoworx where they did another full service order for me.
They removed the transmission, and the old clutch, then installed all the new stuff, with new pilot bushing and release bearing.
They also removed the clutch damper circuit, which is basically a loop back of the clutch line, which is supposed to make the clutch feel easier, honestly every one gets rid of it. The damper circuit makes it very difficult to bleed th clutch system, and really doesn't make any difference in clutch feel. So out it went, and into the trash. They replaced the circuit system with a stainless steel braided clutch line, directly to the slave cylinder. The clutch fluid was re-filled with ATE blue racing fluid.
Lastly they replaced the broken AC line and refilled the AC system with new gas. Since I had informed them of my plans to get the car on the race track one day soon, they also tightened up hand brake system. I had been having a slight mis-fire problem just below 3000 RPM and outside of boost, at a previous trip to Autoworx, the guys had confirmed my suspicions of a faulty Oxygen sensor and place an order for 2 new ones - one for each turbo. So, they swapped the old sensor with the new ones and this instantly cured the misfire.
Speedometer Cable Replacement... August 19, 2010
Just as I was leaving work, I noticed my steering felt heavy... I looked at the speedometer and saw nothing... the gauge was dead! It was most likely the speedometer cable, since that was known to be a common problem. I tore apart the dash board, and confirmed my suspicions, it was indeed a broken cable. Now, its a pretty quick hour and a half job, the hardest part is putting the screws back into the black triangular bracket that mounts on the fire wall. I fired up the car, drove down the street and was pleased to see that everything was back to normal again. I made a tech article of this procedure, since it's so common I figured others could benefit from the walk through:How To: Replacement of Speedometer Cable
Track Day Preparations... September 15, 2010
I was back at Autoworx again, for what felt like the twentieth time this year, and like all my other visits, this one too was just as much a success. The car was in for an oil and filter change; our oil is Gulf Racing 10W60 full synthetic. I had also been having some issues keeping the boost limited to one bar, there must have been a vacuum line leak somewhere behind the engine and I couldn't for the life of me, find it.
Thankfully Haig from Autoworx ran a new vacuum line directly from the intake plenum and tee'd it off to both waste gates. Finally for the first time in months my boost was being controlled by a means other then my own foot on the throttle. It was rock solid at 0.9 bar, and not a moment too soon too! I wanted to be able to get some good pulls at the track day this coming friday, and I would never have been able to do that if I was still having a problem limiting the boost to a safe level. I was now ready to get on the race track!
The day started quite early, we were up and on the road by 6:30, Sanair is a relatively older track in Quebec, located about an hour from Montreal, but it has a really nice lay out and makes for a great circuit track. I'd managed to gather about 8 other skylines from the forums and we all met up for the track day. We spent the first hour setting up tools and our staging area. Then we discussed rules and safety regulations. Following that, we went for a warm up, 5 times around the track slowly to get used to the layout. Then we went around at a bit higher speed, and started to learn the race line.
This was my first time ever on a track and I had a lot to learn. I decided I could benefit from a ride-along in some of the more experienced drivers cars. What came next, I was completely unprepared for. I hopped into a skyline GTS-T that had been modified with a 2.2 L stroker kit. The GTS-T is a much lighter car than the GTR, and this thing flew around the track with such speed it made my stomach upset! Although I think to be fair, anyone having their first ride in a race car at 9 in the morning would probably also feel the same way.
After a few laps I felt comfortable with the track and headed out in my own car. At first I was apprehensive, but as I continued to go around and around, each time I pushed the limit of my comfort zone. Eventually, I was feeling right at home on the track. So I took a few cool down laps and headed into the pit to check the fluids and tire pressures.
After verifying everything on the car was still in perfect shape I headed back out onto the track. This time I was unrelenting, I went down the back straight, reaching speeds of just less than 200 km/h. The back straight was positioned just before the hair pin turn, so I had to reduce my speed to about 70 km/h as we entered the hair pin turn. The car decelerated with so much force I could barely stay in my seat, and I would've slammed into the steering wheel had it not been for the seatbelt! The hair pin turn was a gut wrenching experience, with so much power these cars have a tendency to over steer and the back end comes out, before I knew it, we were almost fully sideways, engine revving near 6000 RPM as the tires roared around the curve. The skill of drifting, power sliding and counter steering suddenly felt natural to me. I exited the hair pin at full throttle, I quickly shift into third gear and start climbing in speed again as the car tears straight through the the S bend, and into a series of left, then right handed gradual turns against a slightly banked wall. I pass under bridge, and explode onto the back straight - which doubles as a drag strip for other events.
I'll never forget the feeling, the smell and the sound of ripping under that bridge and onto the drag way. The tarmac was covered in a thick layer of rubber, and all the sounds of the engine reverberated off the surrounding walls and tunnel. Before I knew it, I was back at the hair pin, slamming on the brakes again.
At the end of the day I had a smile on my face that just couldn't be shaken off. I had so much fun at the track, and most of all, it finally opened my eyes to what people mean when they say: "the Skyline is OK on the road, but it really shines on the track". It was completely true, driving this car on a track is completely different then on the road. On the track, the GTR handles everything you put it through as if it's not even a hard run. I can say the car out performed me, as I was very sore the day after. It's just not feasible to safely drive that way on public streets.
At the same time, we were also filming the track day for a feature length short film we've been working on all about skylines and the skyline community. This is a teaser from the track day:
Winter Storage... November 17, 2010
As winter fast approaches, I felt it was the right time now to store the car for the season. Like last season before storing the car, I like to perform a compression test on the motor, so that if anything is wrong I'll have lots of time over the winter to work it out. I removed all the spark plugs, and they looked pretty decent, considering I've had these plugs for a while now.
The compression test results were great, every single cylinder hit 155 PSI after 3 cranks. I'm sure, had I allowed it to crank to the full 5 cranks it would've reached even higher, near 160 or 170, but anything above 150 is fine as long as theres no major deviation between cylinders, and there wasn't. So another season had passed and I'd enjoyed my car to the fullest extent, and maintained it to the best of my ability, and the results were good. So I'll have to start thinking about what my plans are over the winter. For a complete walk through of how to perform a compression test see the tech article: How To: Compression Test
More parts, from a new source!...December 2010
Well, as usual I was keeping an eye out for any good deals on the forums, its usually about this time of year that people put their cars away for winter storage - as I did - and end up putting things up for sale that they either never got around to, or decide they don't want anymore. As luck would have it, I found a superb deal on a new front sway bar, brand new, made by Cusco Japan. It's significantly thicker than the OEM unit and should provide for better handling in turns. To this point I had almost everything I needed to make the car hit my goal of 400 Wheel horse power, except the fuel parts, and a proper boost controller. I hadn't been having much luck finding any of the rather specific items I wanted on the usual forums and sites so I thought I should try a different approach. This is when I discovered the glory that is Yahoo Auctions Japan, although I have no clue how to read Japanese, I found an exporter to help me acquire what I was looking for. Adam, from Feast Export based in Yokohama Japan, I sent him my list of questions and possible items I'd be interested in and he translated the auction pages for me, making sure I knew what I would be buying. We agreed on maximum bidding prices, and we began to acquire.
So we started with a set of 6 Denso 660 cc injectors, although used they were in great condition, and it was hard to argue with the price. So we jumped on it. Adam sent me an invoice, I paid him, the he made the bids for me. The auction ended and he picked up the injectors for me, and was ready to ship them to my door here on the other side of the world, when I suggested we try to find more and stuff as much as possible into one package, to help save on shipping costs.
Next up we found a brand new Sard in-tank, 280 Litres per hour fuel pump. The price was better than anything I'd seen over here, so we added that to the list. Next we searched for the boost controller I wanted. I was being rather specific with this item, as I had done a lot of research into which boost controller would best suit my needs. Having a good boost controller makes a world of difference in a car were all the fun is generated through the turbos. Each brand - Turbo smart, Blitz, A'pexi, Greddy etc - had different advantages and drawbacks of their own. Also we have to consider dual Vs. single solenoids, features and functions, the whole system.
I knew I wanted dual solenoid, as they were known to be more accurate and better at holding high boost pressures. Most singles are rated to run up to about 16 PSI, since I would be shooting for more like 18 or 20 PSI, it had to be dual for me. I decided on the Blitz SBC Spec R. The design was simple, I liked the fact it wasn't flashy and over burdened with features (like I found the AVCr was). We found one in the auctions previously used, but mint condition nonetheless, and scooped it into our growing pile of parts awaiting transportation overseas.
Lastly I decided to run a search for two items I had long been searching for, but found just too costly to buy from North American retailers. A set of Rays red Dur-Aluminum locking extended wheel lug nuts. They're super light weight, and anodized red, I always felt they would give the wheels a proper pop, with the color theme being red and gold.
I'd been working on a plan to update the look of the engine bay, playing with different color schemes using Photoshop to change the colors around... as part of the updated look plan, like most other R32 drivers, I decided to pick up a new engine ornament cover. I really like the look of the BNR34 emblem, and it was plentiful on the auctions so we got that too.
So we finished up the purchase order, after a few days the auctions all ended and Adam collected the items for me. 10 days later, they arrived on my doorstep in one box, everything wrapped properly. I was now on my way to completing this super car.
New year? New Parts!... January 10, 2011 After being prompted by several forum members to look into how sway-bars work a little more, I found out that its not advisable to change one sway-bar and not the other, unless you want to modify the over/under-steer characteristics.
So, Naturally most cars come from the factory setup to have a little bit of under-steer, thats because in a high speed turn, even an inexperienced driver can handle under-steer, but not everyone would be able to handle an over-steer situation, cause over-steer would send the tail out and spin the car.
Well, so too is the Nissan Skyline GTR setup to come with a little under-steer from the factory, and I haven't made this problem any better by fitting the 9" wide rims in front and the 9.5" in rear, more traction from the rear + it's a rear-wheel biased AWD system, its a recipe for a huge amount of under-steer! Which I noticed pretty quickly at the track, it made the car pretty safe to handle since I'm still a novice track-day goer.
so, by using bigger/smaller sway-bars in the front and rear, one can modify the over/under-steer. For example; If your car is under-steering, and you wanted to help balance it out you would fit a stiffer rear sway-bar, the stiffer rear end will cause the tail to slide out more, effectively correcting under-steer.
So, when my car gets fitted with a stiffer front sway-bar, it would make it under-steer even worse! Not, what I needed at all, so I sent an email over to Adam in Japan and told him to find me a big after-market rear sway-bar, and a set of bushing kits for the end-links (mine are rather worn). He didn't fail me! CMR 30mm Rear Sway-bar with bushings and brackets, and a kit of pineapple bushes for the links.
CMR 30mm Rear Sway-bar GTR and pineapple link bushings
So to put the whole thing in perspective, I measured the OEM sway-bars, and compared them to my after-market ones, heres what I found:
OEM Front: 21 mm (Apparently hollow?)
OEM Rear: 26 mm (Solid as far as I can tell)
Cusco Front: 24 mm (Solid)
CMR Rear: 30 mm (Solid)
So my front would see an increase of 3 mm, while the rear would see 4 mm, I think this is enough of a difference now between front and rear stiffness that my under-steer problem will be much better.
Got a Handle on things... January 24, 2011 I've been putting of the interior of my car for a little, while working on performance stuff, so when I saw this pop up on the forum for sale section, I jumped on it.
Momo Champion Steering Wheel 352mm
Momo Champion Steering wheel, 352 mm, with suede on the top third, really happy with how it feels. I've already ordered up a steering boss adapter from Adam, should be here by the end of the week I'm told.
D'oh! The Adapter...January 26, 2011 Just remembered that to install this I'm going to need a HICAS capable steering Boss Adapter, so a quick email to Adam at feast in Japan, and its on it's way over.
New Wheel Installed... February 3, 2011 Today I collected my Steering boss adapter from the post office, and I got right into the installation of the new steering wheel. It's a pretty quick and easy job, so I wrote up another how to guide right here: R32 GTR Steering Wheel Replacement Guide.
Removing old GTR Steering Wheel
The new one just feels so much better, more solid, less old and looks a lot nicer in my opinion.
Installed Momo Champion Steering Wheel and HICAS Boss
New Seats.... March 4, 2011 After noticing my drivers' seat was starting to deteriorate, I began the process of keeping an eye out for any good deals on seats. I inquired on a few local forums for people selling Bride, and Sparco seats, but I really like to comfort of oem seats, a friend has R34 GTR seats in his R32, and I sat in them a few times and really loved the way they felt and looked. Then I happened to come across a set of R34 seats for sale, in the city, not too far away, and at a very hard to refuse price too. I took in my old R32 seats, and traded them in towards these new R34 seats.
I had asked a few people if R34 seats were direct swap and they all told me yes. Unfortunately when I got them home I realized the seat belt buckles were different, and the r32 clip would not fit into the r34 buckle. So I asked on GTRCanada, and someone was kind enough to send me a set of R32 buckles within the week. Then I swapped the buckles over, and all fit nicely...
But thats not the only thing that wasn't direct fit, there was one other very minor detail. The bracket for the driver side, front right hand bolt, where it attaches to the floor, is actually flat on the R34, but bent down on the R32. This is quite easy to compensate for with one quick tap from a hammer, the metal folds over and the bolt holes line up perfectly.
So, if anyone ever asks you if R34 seats are a direct swap into an R32, the REAL answer is no... But, it's pretty easy to make them fit. The full install of these took me no more than one hour, not including wait time for R32 buckles...
Sway bar installs... I finally got around to installing the new swaybars this week also. Have a look at the How-To Guide for Swaybars, understeer and oversteer, to see how I installed them and a review of the difference in handling and stability when driving.
Front Cusco Swaybar
I also decided to make a small write up for one of the most trivial, yet unclear subjects when working on these cars, considering I was doing it anyways, might as well snap a few photos... How-To: Jack Lift the Car up, and support it with jack stands.
Rear CMR Swaybar
First day of Driving this year... March 25, 2011 Last night the car went in to Autoworx to cover a few things and take it out of storage for the summer, which is fast approaching. But before dropping the car off I had another friend over during the day helping me to finish the new wiring for the speakers, and install the pioneer radio. We got it finished in time and I must say I'm really starting to smile from the way the center console is looking. Heres a couple photos of the finished result.
Anyways, we dropped the car off at Autoworx, and I left them a "short" list of stuff to do, and be ready for pick up friday by 6pm, as always, they more than happily obliged. First of all they drained the oil from the engine, and emptied the oil cooler lines and core as well, and changed the oil filter. They replaced the oil with Motul 15W50 this time.
Next up was the spark plugs, replaced those as well with the usual NGK-R, a visual inspection of the old set reveals I'm still running rich, as is to be expected with no ECU tune yet, rich is better then lean for a turbo car anyways.
Soot deposits on spark plugs indicate a rich condition during combustion
Since I'd told them I planned on heading to the dyno soon they also did a rather thorough inspection to make sure we'd be ready and safe for the dyno. They ended up finding one small coolant drip from a banjo bolt on the rear turbo, tightening it resolved the issue, two clamps had broken on one of the lower power steering lines, resulting in a small drip, so they replaced the old clamps and that fixed that.
They also inspected the vacuum lines for any leaks, the suspension for any worn parts, and found everything to be in good order. Next they did a compression test, unsurprisingly found all six cylinders above 155, so thats good. Then Balanced the wheels, deflated all the tires and rotated them on the rims to optimize balance without using weights. Lastly they installed the new 280 L/hr Sard In-Tank fuel pump to replace the oem GTR pump.
Driving this car is such a pleasure, it feels like its riding on rails. I haven't boosted it past 8 PSI yet because I'm still on last seasons gas, so when that runs out and I can put new 94 in, we'll be good to go. As for the dyno session, I'll be calling soon to make an appointment, things are moving along well.
Boost Controller Install... April 16, 2011 I finally got around to fitting my Blitz SBC-R, the installation process is quite straight forward so I chose not to do a write up on that, plus the number of people who use this exact boost controller is no where near the number using the Profec B, or HKS units, blitz is probably one of the LEAST commonly used, and thats got to do with it's price.
The SBC-R is a twin solenoid design, intended for use on twin turbo cars, or cars running more than 16 PSI, and seeing as I planned to run 18 PSI, when a good condition second hand unit came up on the auctions Adam snatched it up for me at a pretty excellent price.
I installed the solenoid itself right under the air intakes, because there were 2 screws right there that happened to be the exact dimension of the mounting holes in the solenoid, and it was a great location to keep it close to the turbo actuators. I ran the wiring and vacuum line through the firewall and into the center console where I connected it all up.
Initial set up on the SBC-R is extremely easy, 4 different boost settings, Gain, Scramble and even a warning mode where you can tell it: "If I hit 19 PSI, reduce the boost by 8% and hold it steady there"... It's designed to help handle boost spikes and surges.
With everything all set to go, I installed it into the center console right below the Greddy Auto Timer. Then I set the controller for its lowest setting 5% gain, and a + 2 on the actuators. Through out the full rev range it held a rock solid 15 PSI. Perfect, I'm ready for the dyno!
Culmination day! My Day at the Dyno... April 19, 2011 I dropped the car off at ACSP in Laval the night before to give Pat enough time at his own pace to take care of the little things that needed to be done before we could tune, and he agreed to call me up when it was ready for the dyno so I could be there and watch the whole thing.
During the day Pat rewired my Fuel pump with a new relay to supply 13 Volts constantly to the pump. This helps to make sure fuel will always be where it needs to be, and helps to prevent against a short in the old wiring harness for the fuel pump.
Then he had to weld in a bung for his Wide-band O2 sensor, socket my ECU to accept the new tune and lastly install the bigger 660 cc injectors, which were apparently quite difficult to get inside the oem fuel rail, but he managed.
The Dyno at ACSP is a Mustang Dyno, one of the lowest reading dyno's on the market. This is because the power is recorded by whats being delivered through the tires, and onto the "rolling road". The Mustang Dyno gives the most accurate real world reading of power and torque but the downside is your numbers end up looking a little conservative compared to other dyno's that read at the hubs, which always read significantly higher because there is no rolling inertia from the wheels, and zero slipping. On the Mustang Dyno there's the possibility that the wheels will slip sometimes on the rollers and you can see blips in the torque and power curve, but these are easy to spot as they will both dip sharply at the exact same time, and only for a brief second until the wheels get traction again.
He put the car in position, and locked it down with chains and straps, put the giant blower fan in front of the car so that air would still be moving through the intercooler and radiator and got started with programming the ECU.
First thing to do was have a quick check through the systems and make sure everything was all good. Given the all clear from diagnostics he started by adjusting for the bigger fuel injectors, with a few light pulls at the lowest possible boost setting of 15 PSI the car was producing an astonishing 320 wheel horse power! (whp). He was a little shocked at how much power it could put down with so little tuning effort, so he got deeper into it, adjusting the fuel and timing maps from A to Z, he checked every cell and made sure it was a Super safe tune.
I made it clear from the beginning that my goal was not power out right, but more reliability. What good is power if you blow the engine in a week! So he continued to refine the maps and eventually got up to 360 whp in 3rd gear, we were all amazed that 15 PSI was able to hit such good power numbers, and the power curve was smooth as hell too! He had tuned a stock GTR with mods similar to mine that morning, except running oem turbos and at the same boost level that car was making 20 whp less, so thats the difference the 2860R-5's make at 15 PSI, 20 whp.
He explained to me that we dyno tune in third gear because it provides the best resolution, he also explained a little bit about pulling the ignition timing some ten degrees or so, but a lot of the technical jargon is lost on me at this point.
With the low boost setting complete it was time to raise it up to the target max boost setting we planned of 18 PSI, after some fiddling around with the Blitz SBC-R we managed to land exactly at 18 pounds, he did a few pulls in third and ironed out the kinks in the maps, we then let the car cool down for a few minutes before seeing how much power it could put down.
We went up to fourth gear this time because fourth has a direct one to one (1:1) gearing ratio so it gives the most accurate power output readings, and since the tuning was essentially done, it was now time to see what this thing could really do! we watched the numbers climb just north of 400 whp before we maxed out the stock air flow meters at 6,750 RPM, damn we were all a little disappointed because this engine just wanted more! and it was willing to give us more too! we just ran out of room on the MAFs. Oh well the point was made, and the tuning complete. Pat figures that if we didn't hit the MAF limit so soon, we would have seen a max power output of 415 whp, which is an immense amount of power.
Here's a video I compiled of the whole process...
So, because I wanted a print out with a nice graph, we went back into third gear and he did one big easy pull and laid down 390 whp with 303 ft-lbs of torque on a relatively smooth curve, and he reminded me again that these numbers are really conservative and don't really mean a whole lot compared to other Dynos.
He handed me the keys and my buddy Mitch (who'd stopped by to say hello) and I went for a few quick pulls up and down the street. Mitch's car develops north of 500 whp and is a monstrous machine so he was warning me about being careful when driving this car until I get used to the new power level. Essentially it's more than double the power I've been used to handling so far.
In first gear, I let out the clutch and we were away... boost comes in pretty early and hits full near 4,650 RPM. At 1.2 Bars (18 PSI) in first gear, theres not much of anything left in my brain, sheer and utter violence as the car accelerates into oblivion, its only describable as warp speed! before I knew it I was already at 7,600 RPM!! Time to shift, Drop it into to second and the madness begins all over again, all the way up to 7,800 RPM this time we're already doing well over 120 km/hr!! Into third gear now its just mind boggling, its so hard to process all the things around you at that kind of speed, the G-force from acceleration makes it feel like theres an elephant sitting on your chest, and I let off the throttle as we approached the end of the road.
Quickly turned the car around and went even harder back down the street, we stopped back at the shop and Mitch and I were both just sort of giggling nervously, its a Lot of power, and will definitely need some time and practice to get used to.
Feeling very satisfied that all my hard work had paid off, and the tune was perfect, I shook hands with Pat, thanked him for a job well done and parted ways.
Blown ACT Clutch... May 19, 2011
I got this clutch in a pinch last season from a buddy in Montreal, he'd used it for about 1,000 km's and then he had to pull his motor or something so he sold it to me, after a call in to ACT USA, I measured the puck thickness to be less than 0.10 of a mm different from new, and there was no glazing on the flywheel so it was in decent condition, this is a picture on the day I received it:
The clutch is stated for a 300ZX-TT but most people will also use it in the Skyline GTR because it's easy to get quickly and replacement disks are very cheap compared to other brand names. It's an ACT Ceramic 6 puck unsprung hub with a Toda Racing Light Weight Chromolly Flywheel. As a review of how it felt to drive this clutch in my car, it has a very On/Off button feel, the ceramic tends to screech and whine when its cold, and it's not a very comfortable clutch for city traffic. How-ever, the lightness of the setup did make for a very notable improvement in engine response. The revs would rise and fall much much quicker than the oem set up. This clutch handled a few launches under my foot, with a little light feathering into a 4wd launch it hooks up very well and never slipped on me.
Burn marks showing through the backside of the Chromolly Flywheel
Two weeks ago from today, I was doing a launch just as I had always done before, a little feathering and a quick connect to jet the car forward, it hooked up nicer then I'd ever felt before. Up until now the car was running only 13 PSI for all of last season, so this was the first time I'd ever launched the car at my new power setting running 18 PSI since dyno-tuning. As I let out the clutch all felt normal, the car lunged up on all 4 wheels, and roared up the highway on-ramp tearing through first gear like a monster, at the top of first I pressed the clutch in quickly and went to shift into second to continue the glory that was this epic lift off which came to a sudden end. I couldn't get into second gear! or third! Something went wrong here....
Clutch taken apart - visible signs of damage to the disk and flywheel
I pulled over to the side of the road and was towed to Autoworx, where the car would undergo investigation. At first we suspected a blown Slave cylinder based on the symptoms, it made sense. But once the guys realized the slave was actuating fine, they had a look into the bell-housing only see shards of clutch everywhere, it was at this point we knew something went wrong with the clutch, so the transmission came out and what was found was quite interesting. As pictured above right away there were 2 noticeable brown marks completely burned through the flywheel.
Looking at the pressure the plate you can see signs of massive heat damage and something is actually stuck and fused onto opposite ends of the surface!
Here are some close up macro photos of the material which has fused to the surface of the metal pressure plate:
It's obvious to see whats happened here, the clutch disk must have gotten so hot that it fused material from the ceramic pucks onto the pressure plate. There are large chunks of clutch missing in the exact shape and position on the clutch disk. The material is also noticeably worn down completely to the rivets which is evidenced by the scoring on them.
The front side of the disk is pictured in the photos above, and we find the exact same markings and chunking off, on the reverse side of the disk as well.
On the Toda Flywheel it's the same story, massive burns and fused material...
In Conclusion: The guys at Autoworx believe the cause of all this unforgivable heat and fusion to be due to the combination of this clutch with a light weight chromolly flywheel. The thinner flywheel material and less heat dissipating properties of chromolly mean that when launching the car, the heat builds up very quickly and didn't have the chance to cool off, it became so hot that it caused the ceramic pucks to fuse with the flywheel and pressure plate. It's because they were stuck all together that I was not able to change gear. I am happy with the use I got out of the ACT clutch kit, it sufficed for one season and put up with everything I threw at it. I guess the extra power and torque that the new tune has produced was just too much for it to handle, and it was probably close to the end of it's life anyways. This story has been transmitted to Advance Clutch USA, and we'll be posting their response up here when it is available, I'm interest to see their take on this.
For the time being, I have replaced my setup with a new oem flywheel and a Stage 3 Bully Clutch. Bully is a Canadian company based out of Ottawa, so I was able to get the clutch for my car in less than a week. They also offer 90 day warranty which will cover my summer time use, and they've assured me it will be able to handle my car no problem. So far I can say the clutch feel is very light, and the heavier rotating mass is noticeable through a now slower engine response, but it holds the power well. Haven't had the chance to really drive it hard though as I'm still under the break in period for another 350 km's.
Cusco BMC Stopper... June 3, 2011 I came across a decent deal on the auctions a few weeks back for a Cusco brake master cylinder stopper brace, Adam delivered and I received it in the post today. I installed it right away.
It's not as easy to install as it looks like it would be, because its in such a cramped area you have to remove the strut tower bar, the throttle cable and the fuel filter in order to get enough room to turn the wrench.
It's braced on 3 points on the chassis, and after about an hour I had it completely installed. I was skeptical as to how much of a difference it could possibly make, but from even just adjusting the screw which applies pressure on to the cylinder, you could see the cylinder moving quite freely, which tells me normally that cylinder is probably fairly loose. So I do expect to feel a difference when braking.
The End of an Era/... July 2011 With me graduating University in the last few months I decided it was time to make a shift in focus. I had lived with the satisfaction of owning my dream car for 4 years now and had the opportunity to learn and try many amazing things, for which I was grateful. It was time to move on to a new project, a company I had launched with a partner in the music industry, so I listed the car for sale and in no less than 2 weeks later I had scheduled an appointment with a potential buyer who was going to fly in from the West Coast to take a look at the car in person. I had set an asking price of $21,995 but remained flexible to all reasonable negotiations. Finally the day came when the potential buyer arrived, we decided to make a a 2 day session of viewing and driving and site seeing, since him and his girlfriend had never seen Montreal. We collected the pair from their hotel in morning and began the day with some calm relaxed driving while I also took the time to explain the many unique and custom systems that set this car apart from its counter parts. I really wanted to make sure the owner was fully aware of the potential of the car and understood how to use all the extras. We stopped shortly after for breakfast. After eating we continued the tour of the city of Montreal, as we climbed Mt. Royal we stopped to snap some pics of the view. The temperature was blistering outside, but the AC kept up strong. We continued down the other side of the mountain and through the downtown core of the bustling city. We completed the circuit loop I had designed the night prior on Google Maps and hit the highway heading west. Finally some opportunity to open 'er up and really show these 2 what 400 horses feels like.
We did a few strong pulls through the tunnel and made our way off island to an old pub style restaurant. After a great supper we switched roles and I finally allowed the potential buyer to drive for a bit. We whisked up and down the back country roads in what seemed like one heavenly pull after another. Just as the sun was setting we made our way into a boating club where we sat and had drinks and talked turkey. We agreed on a final price and arranged the details for the shipping to take place tomorrow on Rail Car, it would take 2 weeks and would be fully insured, we were to hand deliver the car ourselves to the rail depot tomorrow morning for 9 am. With the sky lit up like a dying flame we drove back to the hotel where I dropped the couple off for the night. On the drive back downtown I had a very somber feeling that this would be the very last time I would drive MY car... I felt upset to have to say good bye knowing there had to be so much more I could have yet to learn and experience, I wanted nothing more than to just floor and watch the needle soar to 300 km/hr while that howling engine screams out the exhaust, yet I never did even build boost again. I decided right then and there that I will always hold that memory of the feeling of solid boost close enough that I didn't need to experience again physically. I had made my peace. The next morning I drove the car gingerly to the hotel to collect the purchaser and his companion. He drove me to the bank where we chased around bankers for an hour until we could both guarantee the funds had cleared the bank. Finally I handed over both sets of keys and we dropped it off at the Rail yard where they inspected the vehicle in front of us. We shared a cab some of the way home, shook hands and thanked each other for a better than expected transaction. Everyone was happy, at least I think I was. I have since returned to a new school now to further my education and my business is growing very well, along with starting a new full time job things are indeed moving along in a very positive direction. I hope the new owner will be as happy with the car as I was. God speed. Here's a set of photos, the last I ever took.
~ FIN ~
Comments
Maxime said…
how do u feel the motul compared to the Gulf 10-60 ?
The Motul IS better I feel honestly, its less noisey with Motul than Gulf, But I have no complaints really about Gulf either, I mean, it did a good a job and more then handled my trackday last year.
Anonymous said…
re: nismo oil cap
"I got it for a steal of a price"
anyone who's been to a junkyard knows exactly what you mean
The Trip/Place... Amazing, i cannot wait to come back! The people AKA Josh And Company... were outstanding to be with! The Car... A piece of art that shines the most in the eyes of the beholder.
I can't believe you had it sorted in its final configuration for only a month and change before selling :( I hope my Skyline story doesn't end the same way. Right now I'm still gathering parts to fix her after customs and the shipping company broke things when I picked her up from port.
Anonymous said…
Great write up! Was searching for build information for my R32 and ran into this blog, I saved and printed it out as my build is very similar to yours, though we are hoping to make 450whp. Beautiful car, sad to hear after reading your whole story you sold her, but hopefully she went to a great new owner, and you will fined another project to blog about!!!
Greatest post i read, really helped me see how long a build could take from days to years its nice to know what you did and how you went on with your project.
Anonymous said…
I thoroughly enjoyed this and all I can say is it has me fantasizing about perhaps someday owning a Godzilla of my own....


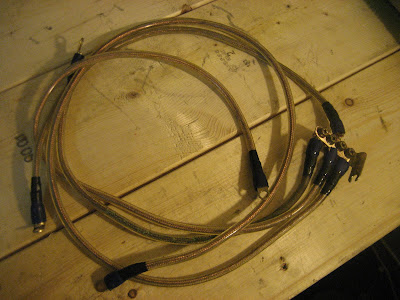


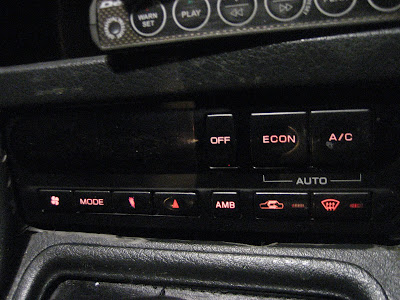


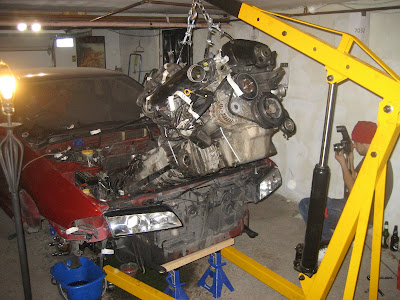

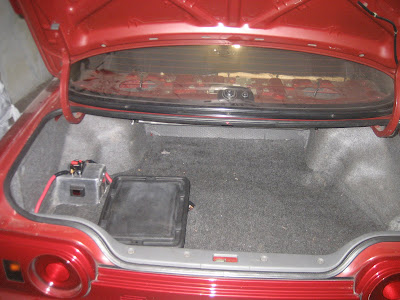


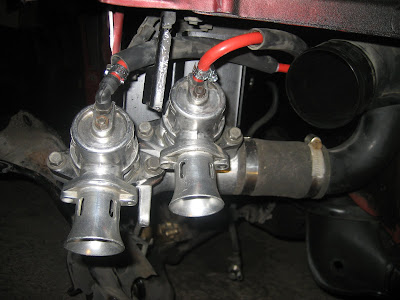


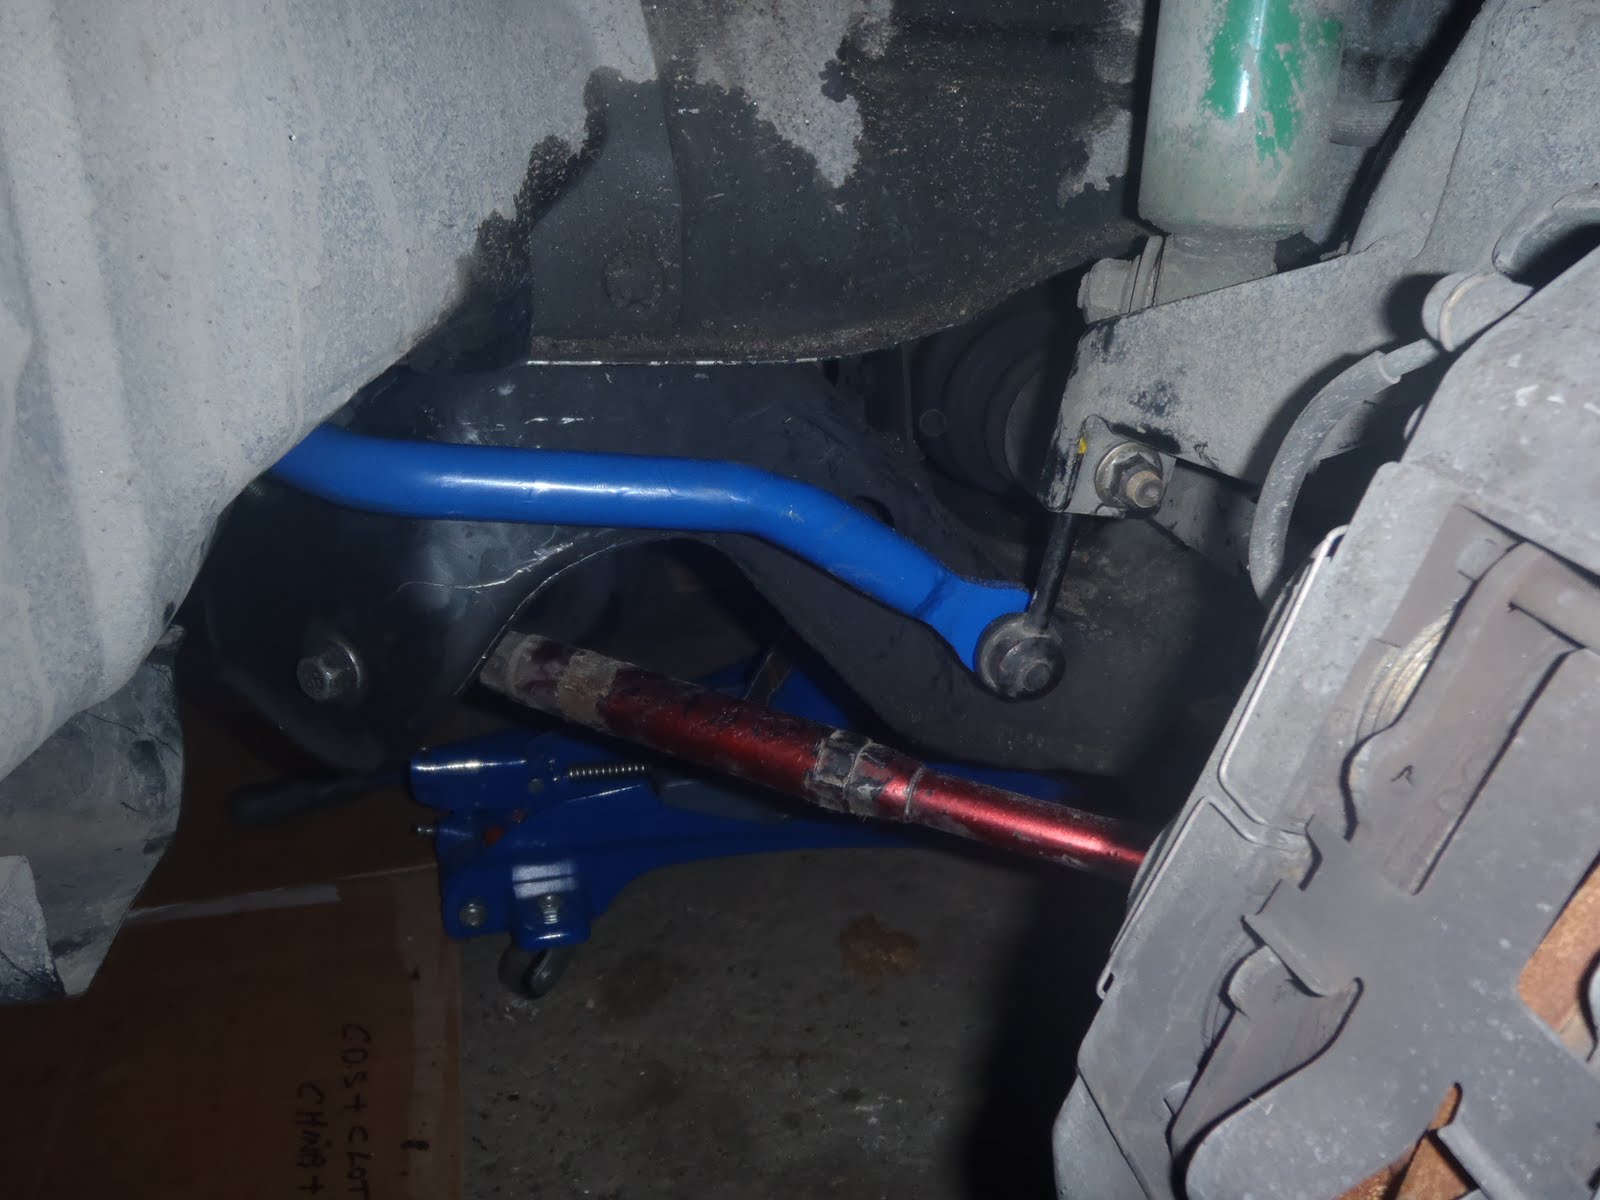


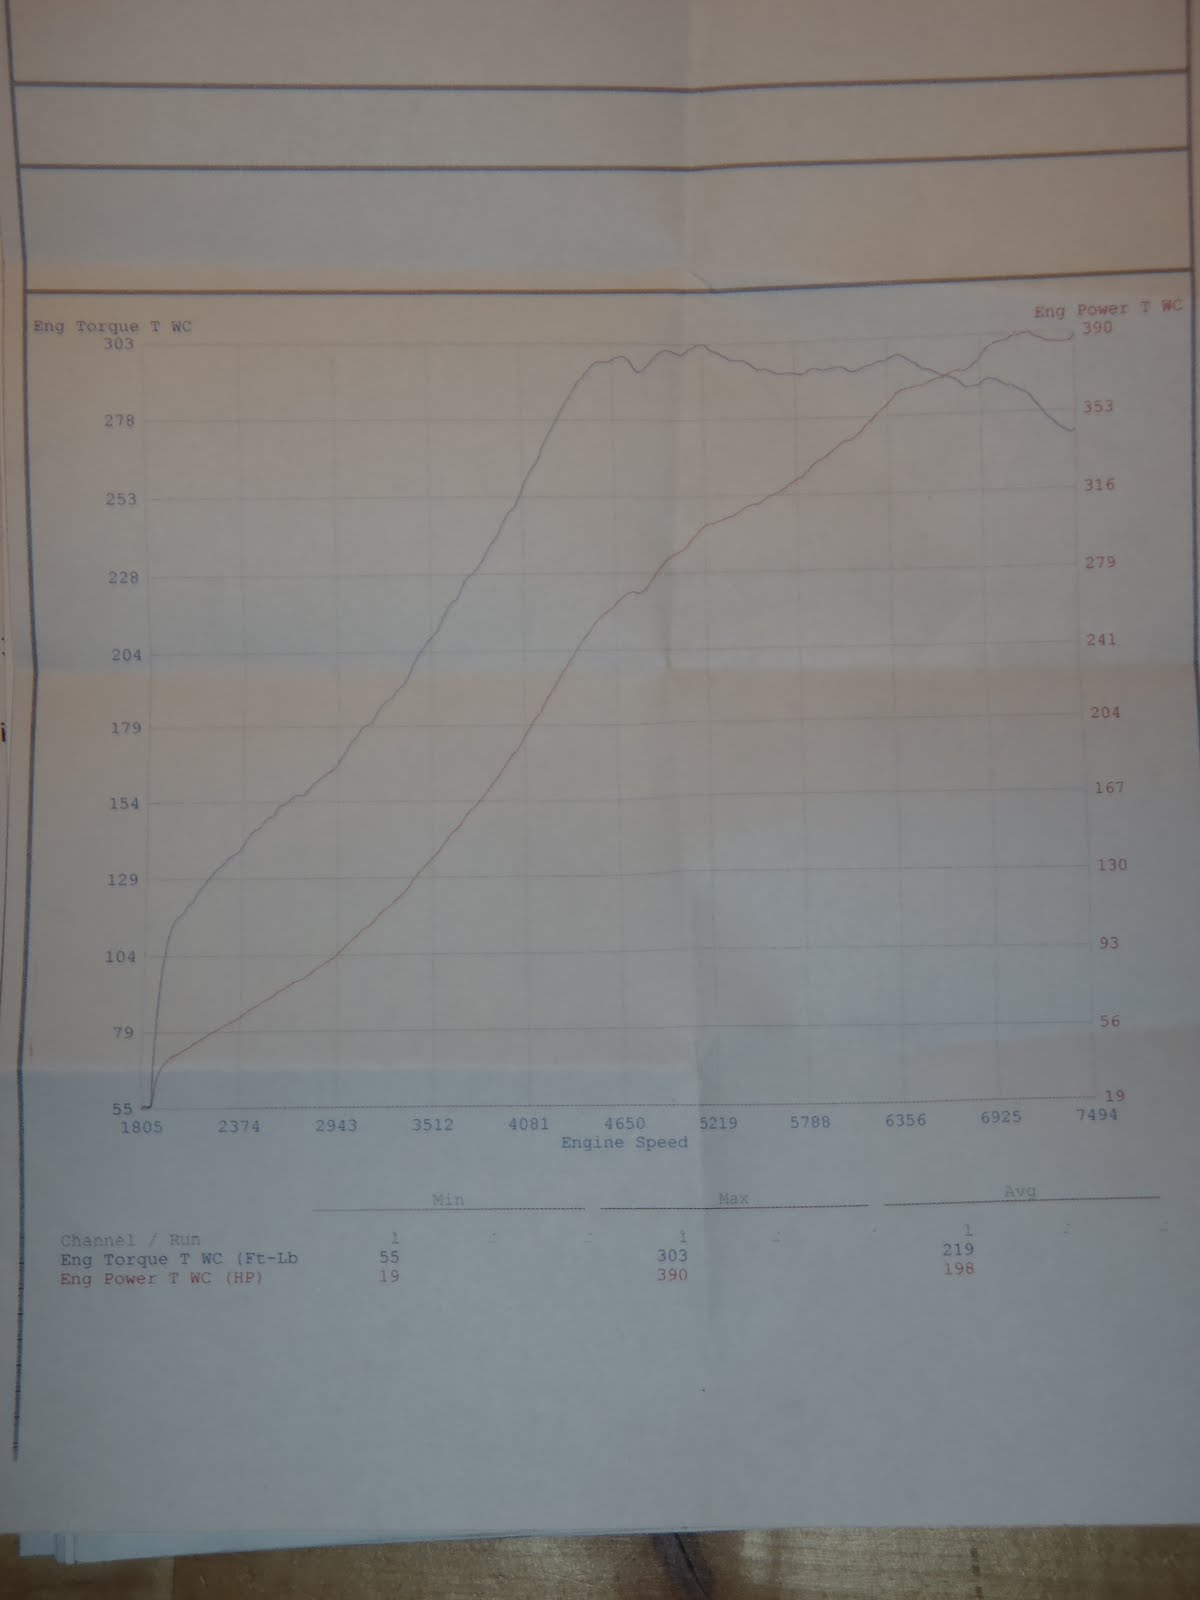


Comments
"I got it for a steal of a price"
anyone who's been to a junkyard knows exactly what you mean
Thanks! It was running a re-tuned Nistune oem ECU
BTW - I think the Supra in front of your car in the dyno video is the one I recently bought. Do you know the car?
The Trip/Place... Amazing, i cannot wait to come back!
The people AKA Josh And Company... were outstanding to be with!
The Car... A piece of art that shines the most in the eyes of the beholder.
Thank you. Shes safe, sound, and happy.
-Brent, AKA The new owner.
Post a Comment