Featured Post

Introducing: The Meanest Looking Custom Built Skyline R34 GTR 1/7th Scale Remote Control RC Car

Passion, It's the thing that drives us to achieve. The push we feel to dare to dream something, ideal, and then manifest that vision into reality. For anyone who's ever fallen head over heels into an engine bay, or body work, or getting your car track ready, YOU KNOW that feeling that drives you to customize and make things as you feel they should be. Your intuition is second to none.  RC Car Skyline GTR R34 Custom Built Remote Control Car This GTR is no different from any of the other incredible cars featured on this site ( just look around; there's red ones , blue ones , silver ones , white ones , black ones ) - except for one, small, detail. - It's 1/7th the size! You wouldn't be able to fit inside it, but it still rips around like a GTR should, and is a whole lot of fun to drive I'm sure, and the customization on this build is phenomenal.  Nissan Skyline GTR RC Car Rear End Spotted on the RC sub, user XJuggernaut101 shared their build story with us of ho

Intercooler Sprayer

Front Mount Intercooler (FMIC) Sprayer

As part of my campaign to reduce engine bay clutter, the windshield washer fluid reservoir needed to move to the trunk. Washer fluid is essential to keeping the car street legal, otherwise I would have just binned the system entirely, and after removing the rear wiper assembly completely, you have a free pump and switch already nicely wired up that can be used as a very discrete intercooler sprayer.
Intercooler sprayer wiring and plumbing
There are 2 pumps on the reservoir, one for the front spray nozzles, and one for the rear. So we're looking at extending the wiring from the fender wall, in through the cabin and into the trunk, and then we'd also need to consider the plumbing. To begin remove the screws holding the washer bottle to the fender wall.
Clean engine bay
With the washer bottle removed, you can push the wiring and the plumbing through the hole in the fender and leave in the wheel well for now, Then you're going to need to remove the kick plate from the passenger side, and lift up the carpet, following the wiring and plumbing all the way to the trunk. Only one water hose goes to the trunk, the other goes up through the fender near the firewall and feeds the front nozzles.
If you go to the trunk now, and follow the rear nozzles' hose forward, it goes through the rear firewall across and under the seats, so remove the rear seats. Then you'll need to drain any excess fluid out before it spills into the cabin and your carpets smell forever like Windex.
Draining fluids from car
Now you can begin the new wiring and new plumbing. The hose that was originally used to supply the rear nozzle will now be used to supply the front nozzle, meaning instead of being hooked up to the rear nozzle, you connect that hose to pump on the reservoir that is for the front sprayer. This way you don't need to run a new hose, and it's the easiest way in terms of workload. If this part isn't super clear right now, read on, it will become more clear in a minute.


You need to run 4 new wires, the entire length of the car, and one hose. I managed to use a rubber hose that I picked up at a pet store in the fish department, it was the exact proper size for the fittings and was really very cheap too.When you cut the old harness, mark each wire so you know which new wire will connect to which old wire in the trunk. You can splice right into the middle of harness that is usually connected to the pump assembly, then run the new hose and 4 wires up along the inside of the passenger fender, through the firewall, and into the cabin, along under the carpet along the rails near the kick plate, up the rear section, under the rear seats and into the trunk.
Wiring for new pump relay
With the new wires in the trunk, following your labels, connect up the new wires to the pumps, you can also have a friend press the buttons inside the cabin to test that its been done correctly and each pump should whir to life as its respective button is pressed. Now, the old hose that's been in there the whole time can be connected to the forward spray motor, and the new hose you just ran can connect to the rear spray motor. There's a one way valve on the older hose, so flip it around and now it should work for the front spray properly. When you press the "rear spray" button inside the cabin, this will trigger the pump to push water through the new hose, and to the front of the car, where you will later install the nozzle to spray the intercooler.
Relocation of windshield washer fluid resveroir
Using washer fluid as an intercooler spray is effective because all windscreen fluids are a mix between alcohol and water, when you spray this on the intercooler the fluid evaporates, which absorbs energy in the form of heat, and makes the intercooler much colder, which in turn increases the temperature differential between the intake and the exhaust and results in more power, it also happens to be safe for track use and is non-flammable.


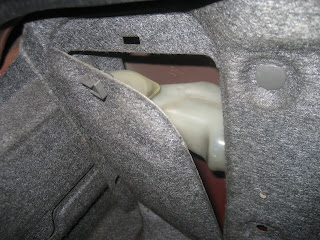
With the reservoir wired and plumbed, it's now time to securely mount it. Remove the panels from the passenger side of the trunk, and you should find a car jack and bracket bolted behind the support beam. Remove the jack, then the bracket by removing the screws. With that stuff gone you can wiggle the reservoir behind there, and secure it with 2 large zip-ties wrapped around it to make an X across it, and through holes in the panel.
Relocation of windshield washer fluid resveroir to trunk
Then you'll notice that the panel door doesn't quite close as the filler spout for the reservoir sticks out a little bit. I solved this by trimming a hole in the door, this also made it a lot easier and more practical to refill once empty.
Hidden  windshield washer fluid resveroir in trunk
The intercooler spray nozzle can be installed into the front bumper, right in the middle facing downward, and the hose can be run along the inside of the front re-bar using a few semi-loose zip-ties to secure it.

Comments

Ker_Koy said…
Thank you for this! Did the washer bottle relocate.